Serving sailors online since 1997
Hunter OEM Parts
General Marine Parts
H170 cup/rod holder installation (with Holesaw)
posted 10-14-2017 by JimInPB
Click for larger view
At the request of a fellow member, I am posting the results of my recent combination cup/rod holder installation on an H170.
The pictures shown here are the results of installing a pair of those combination rod/cup holders at the rear of the bench seats on that little plastic boat. I also did the same installation on a H212. the process and materials were the same. The only difference was that on the 212, I had access to the underside of the seats via the cabin.
This particular choice of location does partially constrain tiller movement when rods are in the holders, but you still get enough travel for average maneuvering that does not involve hard tacking. If you want full motion of the tiller with rods in holders, then the holders should be mounted outside of the tiller arc.
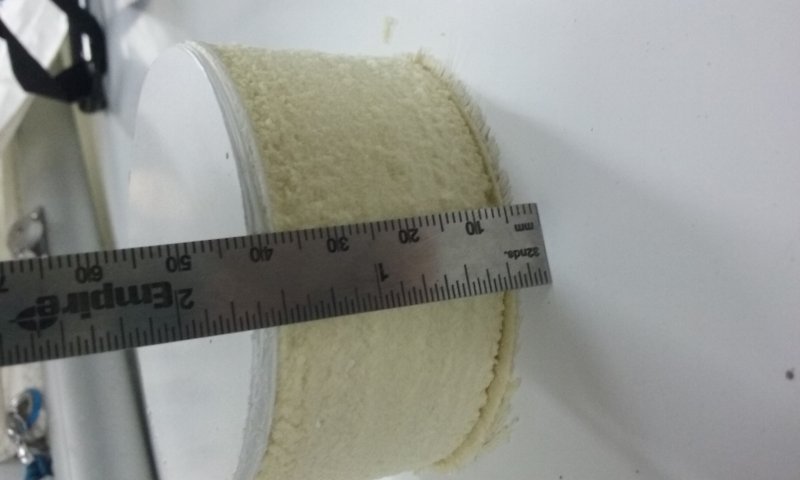
As the first picture shows, the construction material of the boat is a sandwich, with about 1/8” (3mm) of white plastic on the outside, then nearly an inch an a half of foam below that and then a very thin (.040” or 1mm thick) layer of what appears to be fiberglass to seal the underside of the foam. The depth of the foam seems to vary a little bit.
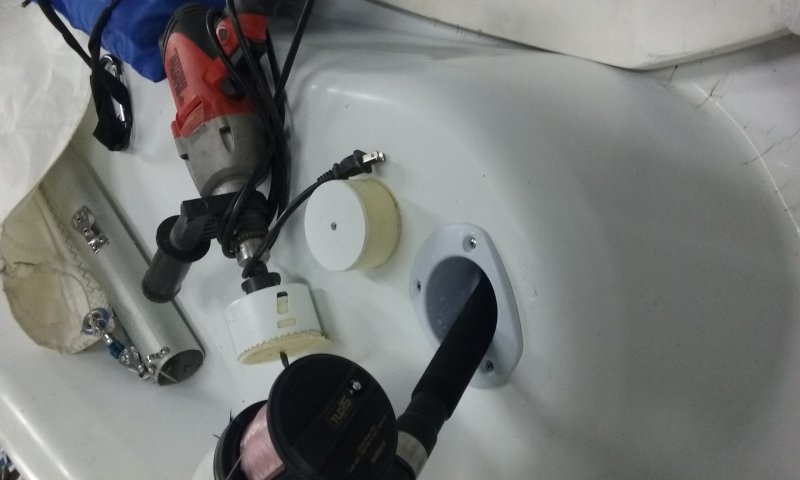
I cut my holes on the seat tops with a 3-1/4” hole saw. This gave me a good snug fit on the parts that I was installing, which is a good thing, because all you are really screwing into is the 1/8 thick plastic layer. The foam below is not solid enough for a screw to get a good bite in it.
I had been advised to use a fine tooth hole saw and go slow. I was not able to locate a fine tooth hole saw in that size, so I used one with standard tooth pitch. I did use a large gear-reduction drill with big handles and I did go slow. The hole saw bit in and kicked the drill back several times, even under gentle pressure with a firm grip, so the fine tooth saw was probably a very good recommendation. Due to minor variations in foam thickness, the hole saw was able to cut all the way through on starboard seat, but not quite make it through on the port seat. I had to cut most of the way through, then pry off the top layer, then cut the last little bit on the port side. The white plastic was a little tough to cut. I seemed to be about half way between ABS and polycarbonate. The foam cut like butter. The thin layer of glass, was just what you would expect it to be.
Once the slug was removed from the hole, I found a large open area inside the seat. On this 9-year old boat, the cavern carried a strong stench of mold, so I introduced a little bleach water to get that under control.
When this boat heals heavily, it does scoop up some water on the bench seat. If the rod holder is not sealed at the bottom or does not pipe out to a drain somewhere, then the cavern inside the seat can fill up with water, which obviously is a bad thing.
I took the boat out for a test run with the new cup/rod holders installed and was happy with the results. My drinks stayed where I wanted them to be and I came home with a Mahi Mahi for dinner.
Every time I picked up a rod, I had somewhere to put my drink. I did need to pull one rod out of a holder before hard tacking.
The pictures shown here are the results of installing a pair of those combination rod/cup holders at the rear of the bench seats on that little plastic boat. I also did the same installation on a H212. the process and materials were the same. The only difference was that on the 212, I had access to the underside of the seats via the cabin.
This particular choice of location does partially constrain tiller movement when rods are in the holders, but you still get enough travel for average maneuvering that does not involve hard tacking. If you want full motion of the tiller with rods in holders, then the holders should be mounted outside of the tiller arc.
As the first picture shows, the construction material of the boat is a sandwich, with about 1/8” (3mm) of white plastic on the outside, then nearly an inch an a half of foam below that and then a very thin (.040” or 1mm thick) layer of what appears to be fiberglass to seal the underside of the foam. The depth of the foam seems to vary a little bit.
I cut my holes on the seat tops with a 3-1/4” hole saw. This gave me a good snug fit on the parts that I was installing, which is a good thing, because all you are really screwing into is the 1/8 thick plastic layer. The foam below is not solid enough for a screw to get a good bite in it.
I had been advised to use a fine tooth hole saw and go slow. I was not able to locate a fine tooth hole saw in that size, so I used one with standard tooth pitch. I did use a large gear-reduction drill with big handles and I did go slow. The hole saw bit in and kicked the drill back several times, even under gentle pressure with a firm grip, so the fine tooth saw was probably a very good recommendation. Due to minor variations in foam thickness, the hole saw was able to cut all the way through on starboard seat, but not quite make it through on the port seat. I had to cut most of the way through, then pry off the top layer, then cut the last little bit on the port side. The white plastic was a little tough to cut. I seemed to be about half way between ABS and polycarbonate. The foam cut like butter. The thin layer of glass, was just what you would expect it to be.
Once the slug was removed from the hole, I found a large open area inside the seat. On this 9-year old boat, the cavern carried a strong stench of mold, so I introduced a little bleach water to get that under control.
When this boat heals heavily, it does scoop up some water on the bench seat. If the rod holder is not sealed at the bottom or does not pipe out to a drain somewhere, then the cavern inside the seat can fill up with water, which obviously is a bad thing.
I took the boat out for a test run with the new cup/rod holders installed and was happy with the results. My drinks stayed where I wanted them to be and I came home with a Mahi Mahi for dinner.
Every time I picked up a rod, I had somewhere to put my drink. I did need to pull one rod out of a holder before hard tacking.

Click for larger view
Please picture the attached photos turned 90 degrees clockwise. For some reason, they rotated when I uploaded them and I dont see a way to edit the photo orientation.